Thursday, December 23, 2010

Lesson 14: Character Cake - The Little Mermaid (Disney Princess Ariel)

Ok, I've made a few cakes during my cake decorating classes but this is by far my favourite cake!  It's not the most complicated or technical in execution but it's the prettiest!   The Little Mermaid is my favourite Disney cartoon and Ariel is my favourite Disney Princess back in the days when they didn't market the Disney Princess as a separate product.  


The cake was made with the Disney Princess Ariel Wilton cake pan and then decorated with buttercream.  The sides were iced with the Cake Icer Basketweave tip #789.  Then we outlined the face with black coloured buttercream and we filled in the banks with the Open Star tip #16.  The challenge was drawing the outline, filling the face in is time consuming and tiring but not too difficult.  Decorating the sides of the cake was equally as fun.  Creating the waves, starfish, fish and octopus just completed the mood for the cake.


  This cake just makes me happy looking at it. 


Wednesday, December 15, 2010

Lesson 13: Royal Icing Flowers

This lesson we learned to make flowers with royal icing.  Royal icing is really harder to get out of the piping bag than buttercream so my hand was a little more tired than usual after this lesson.  The cake was firstly covered with fondant then we created Lillies, Petunias and Ponsettias with leaf tip #67 using the Lily flower nail.  We were also taught how to pipe Morning Glory, Daffodil, Carnations and Chrysenthamuns (by far the trickiest).  I also finally learned the technique for Swirl Drop Flowers.  We did it on a hard surface like the table so it was easy to keep the tip steady on the table while we turned our wrist from 3 o'clock to 6 o'clock position to create the swirl. Try doing that on a cake that has buttercream on top without messing up!


The flowers made from royal icing take 5 days to a week to dry and we assemble it onto the cake using royal icing to 'glue' it on.  We also learned to create decorations from royal icing; outlining a pattern and then flooding the inside.  That's how we made what I call the 'Wilton bird'.

Useful tips: Keep the tips of your piping bags filled with royal icing covered with a wet cloth to prevent crusting.

Lesson 12: 2 Tier Buttercream Cake with Roses

There really isn't that much to explain about this lesson except we learned how to stack a 2 tier cake with dowels. The top of the bottom tier was not really iced, we merely smoothed the buttercream from the edge to the centre so it was lightly covered because the roses would cover the layer.


I'm still not happy with my roses as they always seem slightly flat. I need a bit more practice to be more consistent with the results.


Monday, November 29, 2010

Lesson 11: Three Tier Fondant Cake

I like having the opportunity to cover cakes with fondant because you learn how to correct mistakes like the fondant cracking.  Before, I used Icing Sugar to dust the surface of the table and everytime it got sticky, I added more icing sugar.  Now, fondant is made of icing sugar so the more you put on the table, the more it absorbs and the harder it gets.  So it becomes dry and when you put it over a cake, it may start cracking especially around the edges of the cake where it stretches the most.

I went on the internet to look for some advice and some people suggested adding some glycerine to the fondant which I did try and made a slight difference but the most effective thing to use is shortening.  Use shortening on the work surface and when you put it on the cake and little cracks appear, rub some shortening into the area and use your warm fingers to massage the crack shut.  It works!  Not perfect every time but it works.  The other trick is to be quick with the kneading, the rolling out and putting it on top of the cake.

This lesson was about making a 3 layered fondant cake and we had freedom to design it as we wished with some ideas from pictures of cakes by former students.  I made my cake the in my style which is simple and elegant.  Granted my style is neither cutesy nor is it opulent... it's just me.  Now on the other hand, if I was asked to make a cake for a kid, I would take a different approach. 

Some of my classmates in the replacement class did some pretty cakes especially the one with the picnic theme.  One of the teacher's assistants, her name (I finally found out) is Yun Jung is especially talented with sugar craft.  She can make the most realistic people models, the cutest animals and she's like 12!  Ok maybe 22.  I can learn a lot from this girl but I think being naturally artistic helps in using gum paste.  Here are some shots of the things she made on the cake.  I especially LOVE the dragonfly!


Anyway, here's my cake which was inspired by the colours on my daughter's blanket.  If I had more time I would have added white polka dots to the green ribbon.  I find myself gravitating a lot to butterflies nowadays.  Strange.  They are pretty to look at though. 

Tuesday, October 19, 2010

Lesson 10: Fondant


I had been really looking forward to this class.  Covering a cupcake with fondant is quite different from covering a cake with it.  My first attempt nearly ended in dissaster and I was trying to cover a cake that was 10" high!  At the begining of the class we were shown a dozen photographs of cakes that have been covered and decorated with fondant and were given an option to choose a design.

There were some really beautiful designs to choose from but I wanted to try a technique that was different from your standard covered cake with bows so I decided on one that covered the cake in angled stripes.  The colours for these stripes were inspired by a dress I saw recently that had a fabulous combination of lipstick red and fushia.  There were a few looks exchanged between the teacher and her assistant when I mentioned the colours as they were deep colours so required a lot of mixing and kneading to achieve.  I guess they were wondering whether I would have enough time as well to complete it within the 3 hours it was quite a bit of work.


I got down to business and while my other classmates choose some nice pastels which took 10 mins or less to mix into the fondant, I had 2 really deep colours to mix.  You have to mix the colours into small batches of fondant just in case you make it too dark... which wouldn't have been the problem in my case but I went with it  After almost 30mins I had my two colours and was ready to knead.  By this point, most everyone else was covering their cakes.

First I had to roll them about 4mm thick into long and wide pieces then cut them into equal lengths.  They also have to be the same width otherwise the cake is going to look like it came from the Mad Hatters Tea Party... hmmmm, might be an idea for another day!
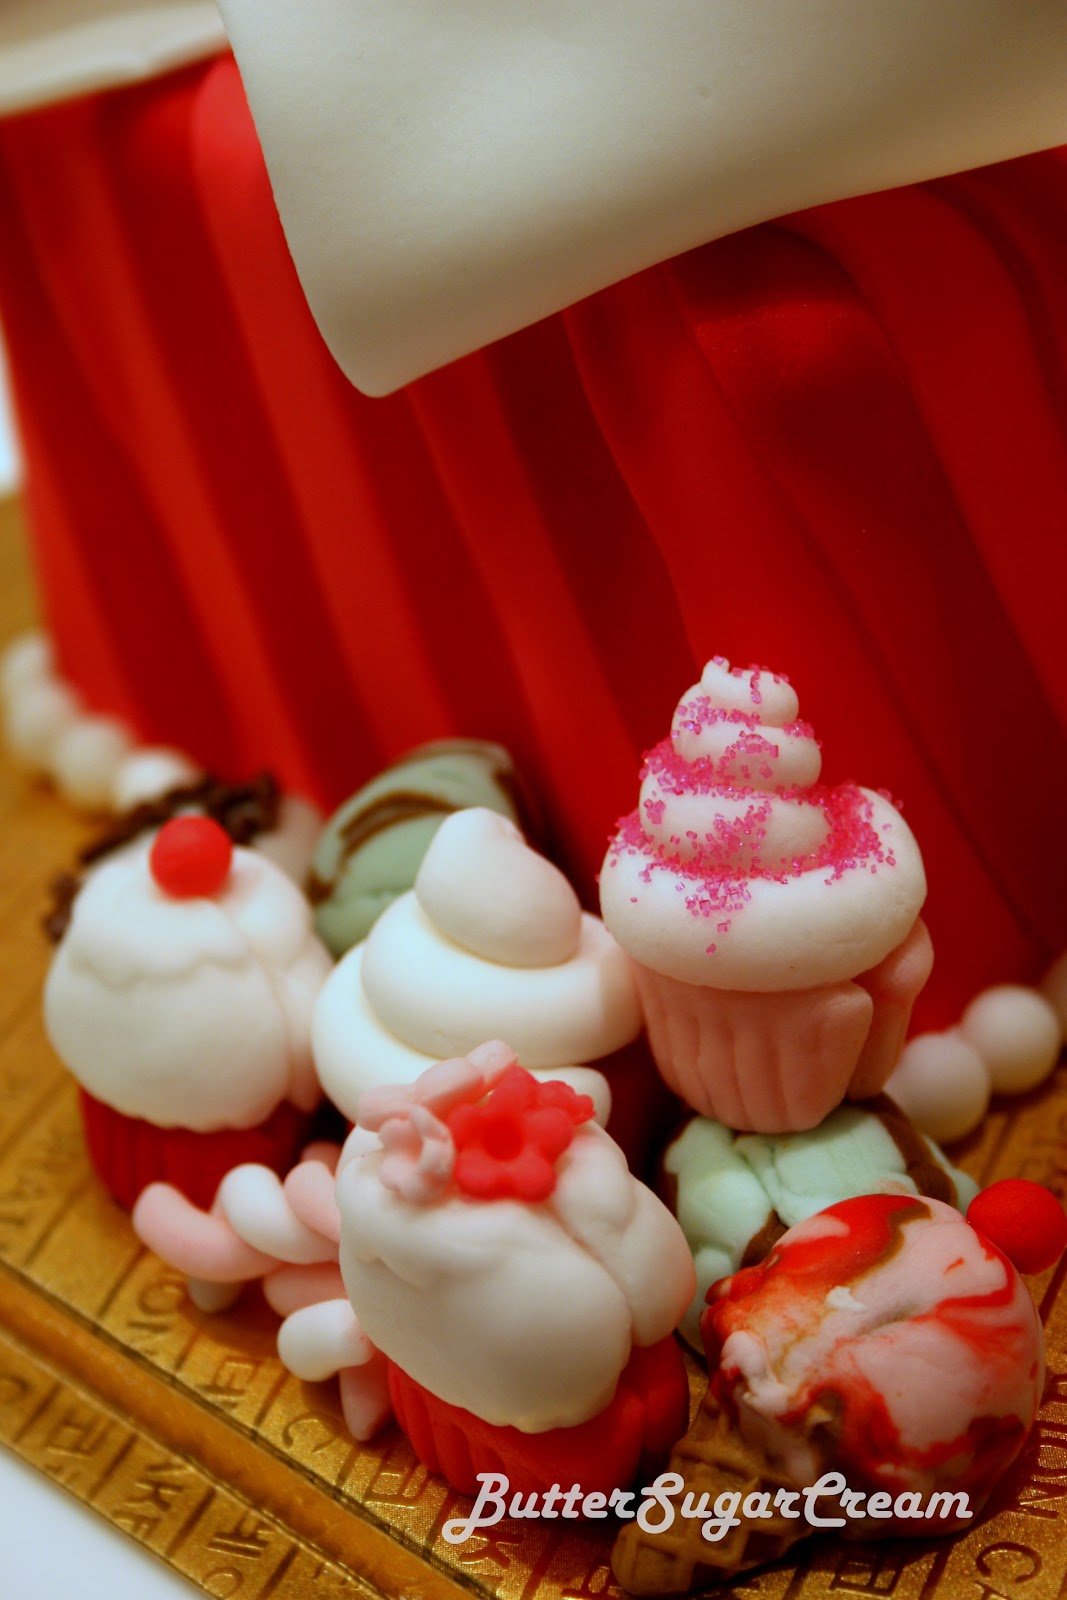
This was time consuming.  I laid the strips in angles onto the fake cake.  It was actually a styrofoam square so that we could keep the cake for months.  The first method proved a little difficult as the striped bunched up at the top.  Crystal suggested we cut the strips shorter so there will be a little gap in the centre and that would be covered by the ribbon.  1 hour 45 mins later I had covered the cake in strips of red and fushia.  Next came the ribbon on the top which was relatively easy to do and then I made some mini cupcakes and marshmallows to decorate the corner of the board.

One of her assistants (I still don't know her name till today - must find out) was helping the rest with the decorations and helped me make a cupcake, a doughnut and 2 ice creams!  They were adorable!!  It's like giving playdough to an adult and given more time I am sure I would have liked to try to make a Sundae!


Wednesday, September 22, 2010

Lesson 9: All About Bears

When we got the brief for what we were going to do this week, I was a bit hesitant. Bears... it looks a little difficult. We had to pipe bears in all sorts of poses on top of the cake or on the side of the cake. I was not very confident going into class but still looking forward to it as I had something in mind.


We were given some photos of what some other students had done in the past so we had a starting board. I always love being given a brief, it allows me to work off an idea without too many limitations. As most of what techniques we were going to apply have already been taught, we had some time to practice icing a cake and decorating the mock cake. I tried a few different piping techniques and finally settled on a design that used swags/garlands and a bow around the cake. I love love LOVE creating ruffles with leaf tip #67. So I used this to create swags between each 'pillars' which I did with basketweave decorating tip #47.

Ruffles and ribbons - what a sweet combo.


If you don't want to buy a Cake Dividing Set ruler that has indications equal spacing sections that allows you to mark precise spacing for garlands, stringwork etc. then I suggest you start one pillar at 12 o'clock then at 6 o'clock first. This will neatly divide the cake in half. Next pipe a pillar at 3 o'clock then at 9 o'clock. Depending on how wide you want to space the pillars then you pick the centre between each pillar and pipe another pillar etc... I think you get the idea.

Young Hee hard at work putting the finishing touches on her cake


Gyeong Ha's Cake with Twin Bears

Aren't those little paws adorable?

Concentrating hard and trying not to mess up at the last part

The bears I did were ballerina bears and I wanted to use different tips to create different types of ruffles. For the pink tutu, I used #352 and for the yellow tutu I used petal tip #102. Then I piped in the top of the tutu with round tip #3. With these two tips I also chose a slightly different way of drawing the top in. One I use dot piping and the other I just drew it in. The ballet slippers were done with tip #2.


I added some balloons with round tip #12 and then added little love hearts sprinkled around the cake with tip #2. My other classmates had some creative designs too. Min Young, always adds her own unique twist to her designs which are very refreshing. Here's are some pics of her cake.

Min Young's cake with the pretty hearts almost blending together


I like how her bears are darker and they are chilling at the side. Min Young likes to step out of the comfort zone and that's a wonderful attitude to have for any kind of designer.tion

Monday, September 13, 2010

Wilton Method - Cake Decorating Schools in Korea

I've recently been asked about cake decorating schools in Korea but outside of Seoul.  The one that was asked by Stacey for a school in Ulsan, it's called JJ Cake.  For a more comprehensive list of authorised Wilton dealers and schools/instructors click here.  Korea is on page 14.