Showing posts with label Cakes. Show all posts

Wednesday, December 15, 2010

Lesson 12: 2 Tier Buttercream Cake with Roses

There really isn't that much to explain about this lesson except we learned how to stack a 2 tier cake with dowels. The top of the bottom tier was not really iced, we merely smoothed the buttercream from the edge to the centre so it was lightly covered because the roses would cover the layer.


I'm still not happy with my roses as they always seem slightly flat. I need a bit more practice to be more consistent with the results.


Monday, November 29, 2010

Lesson 11: Three Tier Fondant Cake

I like having the opportunity to cover cakes with fondant because you learn how to correct mistakes like the fondant cracking.  Before, I used Icing Sugar to dust the surface of the table and everytime it got sticky, I added more icing sugar.  Now, fondant is made of icing sugar so the more you put on the table, the more it absorbs and the harder it gets.  So it becomes dry and when you put it over a cake, it may start cracking especially around the edges of the cake where it stretches the most.

I went on the internet to look for some advice and some people suggested adding some glycerine to the fondant which I did try and made a slight difference but the most effective thing to use is shortening.  Use shortening on the work surface and when you put it on the cake and little cracks appear, rub some shortening into the area and use your warm fingers to massage the crack shut.  It works!  Not perfect every time but it works.  The other trick is to be quick with the kneading, the rolling out and putting it on top of the cake.

This lesson was about making a 3 layered fondant cake and we had freedom to design it as we wished with some ideas from pictures of cakes by former students.  I made my cake the in my style which is simple and elegant.  Granted my style is neither cutesy nor is it opulent... it's just me.  Now on the other hand, if I was asked to make a cake for a kid, I would take a different approach. 

Some of my classmates in the replacement class did some pretty cakes especially the one with the picnic theme.  One of the teacher's assistants, her name (I finally found out) is Yun Jung is especially talented with sugar craft.  She can make the most realistic people models, the cutest animals and she's like 12!  Ok maybe 22.  I can learn a lot from this girl but I think being naturally artistic helps in using gum paste.  Here are some shots of the things she made on the cake.  I especially LOVE the dragonfly!


Anyway, here's my cake which was inspired by the colours on my daughter's blanket.  If I had more time I would have added white polka dots to the green ribbon.  I find myself gravitating a lot to butterflies nowadays.  Strange.  They are pretty to look at though. 

Sunday, September 12, 2010

Lesson 8: Primrose, Apple Blossom, Violet, Wild Rose

The lesson started out with me being late then throughout the class I was just so clumsy. I bet the girls sitting next to me were wondering what was wrong with me. I was such a clutz that day. I dropped my flower nail, I nearly dropped the piping bag, I got icing in my tip case, I tripped over the table leg and horror of horrors, I smudged my cake. Sigh, the icing on the cake would have been for me to fall off my chair… with the cake.

I think I was just overly tired. It’s been a few late nights and then my son still doesn’t sleep through the night. This probably contributed to me being not quite myself. Probably attributed to why I found this lesson particularly hard. According to the other girls, they found the roses hard but to me, the roses were easy compared to the Primrose for example. I just couldn’t get it right for the longest time and finally when I was sort of getting the hang of the heart-shape of each petal, I couldn’t get the thickness of the icing right for each petal.

Reasons why the Primrose is a challenge for me:
1) Each petal is in the shape of a heart so that means different pressures and strokes to create just one petal
2) One part of the petal is thinner than the other
3) One part of the petal is more rounded than the other
4) I have to make 5 of these and make them look uniform (Aargh!)

Primrose (Yellow), Daisy (White and Peach), Violet (Purple)

That aside, the apple blossom is ok. Once I got the tip at the right angle to give the petals a bit more height it started to look much better. The Violet (#97) was probably the easiest and the Wild Rose was a larger version of the Apple Blossom. We also learned to pipe the fern with leaf tip #57 and the Violet Leaves with tip #103.

Crystal told me that I need to practice more. Yes mam!

Saturday, September 11, 2010

Lesson 7: Basketweave and Daisies

I still remember seeing the Basketweave technique of piping buttercream for the first time.  I looked at it then tried to read how to do it and the words sort of just became a jumble of what came first, what came next, hold your tip at such a such an angle, woikjf inwleij kje iae oeetwe ij aijl and so on and so forth.  So boy was I happy someone was going to teach me!


And you know what?  It was easy to learn!  People who saw the cake would go, "Wow!  That looks really difficult" and secretly I want to nod my head, look really serious and go, "Yeah."  But I don't and maybe, just maybe a couple of people were thinking, "Show-off!".  Whatever.  The thing I like most about the basketweave (tip #47) is that it is quite versatile and a easy way to cover your cake.  White is very elegant and pastel colours just look like it came off the pages of Country Living magazine.


Next up were daisies.  Lots and lots of daisies.  These were really fun to pipe too. (tip #103)  Position your tip on the 2nd part of a 'V' and then pipe in a fairly upright position to give your petals that nice full looking petal.  Be sure to ease off the pressure on the piping bag as you drag the tip to the centre to get a nice narrow end to the petal.  We piped 2 sizes of daisies onto wax paper then transfer that onto a cake board and popped that into the fridge to harden.  Once the cake had been iced and decorated with the basketweave style along the sides of the cake then we place the daiisies on top of the cake.


Wednesday, September 8, 2010

Lesson 6: Ribbon Roses and Strings


In this course I will learn a total of 16…or was it 19(?) types of flowers. Whichever, 16 is a big number in my books! I was happy to learn the rose. So the ribbon rose is heaps easier than the Victorian rose. It’s a matter of squeezing the piping bag with consistent pressure and turning the flower nail smoothly. The flower looks like a rolled ribbon, hence the name. We used petal tip #103 for this and we also learned to pipe roses with that tip. The technique is similar piping the Victorian Rose.

To decorate the side of the cake, we learned to pipe strings. It’s really quite simple but to get your hand to behave and not shake is challenging. If you have bubbles in the BC then it may look like something has been taking little nibbles out of it. What I learned that was helpful to ensure that the string starts well is to touch the tip to the top rim of the cake then start squeezing and pulling the piping bag down and make sure the tip touches the surface of the cake at the bottom too so the string remains attached to the cake.

Here is a perfect example of imperfect strings

What I loved best about this cake is the ruffles! It is so simple and so pretty. Using the leaf tip #57 squeeze the piping bag and pull the bag with medium speed in the direction you want the ruffle to ‘roll out’ and Voila! I can think of so many ways to use this style.

Tuesday, August 31, 2010

Lesson 5: The Victorian Rose

 
This is the most beautiful cake I have made to date. It was almost painful cutting into it as it had to be eaten. Last week (I am finally up to date with my posting) we learned to pipe Victorian roses with the Wilton petal tip #97

They weren’t as difficult to learn as I originally thought but without my teacher showing me exactly how it’s done they might not have turned out as well. The Wilton book shows you the positioning of the bag and the angle of the tip with accompanying pictures. So if you follow you could create the rose, although you might find that it does not look as good as the picture. Even after seeing my teacher do a demo, my roses either looked flat or wonky. I was getting frustrated.

She came around to me and held my right hand and showed me how to pipe it. Learning to create roses, I realize that it is crucial where you position the tip and how much pressure to use when squeezing out the buttercream. Of course your left fingers (if you are a righty) have to twirl the flower nail smoothly too with the right amount of increments.

Sound hard? Well, it is not simple but it is definitely do-able! I chucked quite a few roses when I thought they look wilted or like someone trampled on them. Not pretty. The buttercream colours were a choice of pastel yellows, peaches and pink with an accent of violet. It made the cake look like it came right out of an English rose garden.

Can’t wait to try it somewhere else… a cupcake perhaps?

Sunday, August 29, 2010

Lesson 4: Icing the Cake

I have this love-hate relationship with the drop flower tip. I never seem to get consistent results using this tip. A lot of the time the petals separate from each other when I lift the tip. I don’t know if this happens to you. If it does, I’d like to hear about it so I can have someone to complain with. Crystal tells me to let the tip dip in a bit (what a tongue twister) before pulling it up and I do try that, it works for maybe 3 and I am over the moon and then it screws up again. This is when working with American Buttercream is better because with a simple toothpick you can sort of rectify the bodged job. However with the meringue buttercreams…

We start off the morning with practicing some of the previous patterns that we’ve learned like the shell, reverse shell, floret, ribbon, rosebud… gosh listen to me! Rattling off all these styles.

Then we get started on practicing icing a cake. We get a round wood block which in another life may have been a chopping block. We are taught the way to hold the spatula, how to drop the icing on top of the cake and the gentle back and forth motions required ensuring even distribution of the icing over the cake all the while spinning the turntable in short and smooth jerks. Ok, maybe “jerks” is not the right word to use to describe the motion but I can’t for the life of me think of the right word just now. You know what I mean.


The hard part was icing the sides of the cake. Holding the spatula at 90 degrees to the cake turntable at the 6.30 o’clock position and giving the spatula a 30 degree angle to the cake you have to then use those gentle back and fort motions to ease the buttercream evenly onto the sides of the cake. And at the same time you have to be tuning the cake around. PHEW! If that’s not daunting enough, you have to finish each dollop of buttercream with a sweeping motion away from you don’t get any crumbs on the spatula. If you do, you run the risk of ‘contaminating’ the rest of your BC. I hate seeing crumbs on the icing. Absolutely hate it… but it’s sometimes unavoidable. You clean one up and you see another. So the trick is to be really generous with the BC when you put it on the cake and just slowly sweep off the excess as you go along.

I was quite happy with my final result which we topped with drop flowers. Whether I can do that again is another question. Practice, practice, practice!

Thursday, August 26, 2010

Lesson 3: The Rosebud

I am really enjoying my lessons and to be honest, I would enjoy it more if I understood what everyone was talking about. One of my classmates, Gyeong Ha (경하) is a right Little Miss Chatterbox but not in an annoying sort of way. I actually really like the chatter that she generates and although I don't understand, from all the expression with that "ya's" and the "yo's" that I am hearing I'm sure it's interesting stuff. She has a friendly personality and is quite wicked with her rosebud piping techniques.

Gyeong Ha taking a pic of her half finished cake

She broke the ice with me right away with her basic English and of course that endeared her to me right away. She sits on my right. Another classmate is Hee Young (희 영) who is a really nice and very focussed. She doesn't speak any English (unless you consider Konglish) but that simply does not deter her from striking up a conversation with me. From Day 1, she has been talking to me in Korean while I pick up maybe 3 out of every 10 words that she is saying and try to make out what she is saying from 3 or 4 sentences then I will either say "Mullayo" as in "I don't know" or do my best to answer in my broken Korean. Charrayo! (잘아어!)

I think of her as the Mama of the group. Not so much as because she brought her 9 year-old daughter for the first lesson who was quite well behaved and patient which is unusual for a 9 year-old (most of us are Mamas there) but she just looked out for me from the offset. When teacher tells us what tips to use, she sometimes forgets to switch to English and I understand most of the numbers albeit a little slower but sometimes when I am focussed on practicing, I don't hear it and Hee Young will show me which one to use. She's very dedicated and takes a 2 hour journey each way just to come to class. She's learning to hopefully start her own home baking business soon. Go Hee Young!

Hee Young decorating with 100% concentration. She's piping dots which they call 'teng teng' in Korean. All I was hearing at one point when Crystal was giving instruction was "(blah blah blah) teng teng (blah blah blah). [Repeat]". So I had to ask what this 'teng teng' was as no one thought to translate.

So in Lesson 3 we learned to pipe the Rosebud. There's 4 steps to it:
1) Base Petal
2) Overlapping Petal
3) Sepals
4) Calyx


No, I did not translate this from Korean... I have the book. It's in the Wilton Method of Cake Decorating: Course 2. The trick with this is getting the angle for the overlapping petal right. I get the best results when I don't let my tip touch the decorating surface and let the icing roll the base petal over. The sepals and calyx were easy. We piped these on to baking paper that was laid onto cake boards and made 2 colours of the rosebuds and put the in the fridge.

The reverse shell and the 'teng teng's'

After that, the teacher and assistants (there are 2... or 3) helped us ice our cakes. Once that was done, we piped a decorative edge on the base. I did the reverse shell which is my favourite so far. Then it was time to take the rosebuds out of the fridge to place artistically on the cake. Very pretty. I brought the cake out for a party I had the next day and no one dared to cut the cake! I plunged the knife in in the end so people could help me eat it.

Monday, August 23, 2010

Lesson 2: Clowning Around

Today we learned to pipe the floret with the Open Star #16 tip. I must say mine doesn't look as chubby but passes the grade. We continue piping stars for the Clown Car but I must say it was fun learning how to make the clown's body which was done with the Open Star #22 tip. The head is made from plastic but the body can be in all sorts of different positions. However, as the body is just buttercream, I am not sure how well it can hold up the head if it's not refrigerated.

Besides the Car cake, we also had a choice of 3 designs for cupcakes. We also learned to pipe grass which I have done before so it was quite easy then Crystal taught us the different ways to use the Round Tip #12 to create all sorts of different animals. Gave me a lot of ideas and really armed me with the ability to create more designs with just one decorating tip.

Florets to create the wool on the sheep

The duck is actually a candle and looks right at home in his little cupcake pond.

These are suppose to be images of my kids. I liked piping the hair although couldn't quite get the mohawk right for Zac.

Saturday, August 21, 2010

Lesson 1: The Easy Stuff

So, I get to class at 9.20am like I was told and there are already 2 students there. Crystal (the teacher) introduces me to the other two ladies who are home baking teachers. But I get the first hint that Crystal will be doing basic translation services. Cool! I’ll figure out the rest myself.

I get a name tag with my name in English and Korean and Crystal sits down with me to go through a list of tools that I will need and those that I have the option to buy if I don’t have the equivalent. I brought the tools that I had already and we compared them with the list and also the Wilton products. Immediately, I can see the difference in the quality of the Wilton products. For example, my angled spatula that I bought from Bangsan market is a lot more bendy compared to the Wilton one which is pretty solid. Crystal pointed out to me that when I am icing a cake, the weakness of the no-brand spatula may cause unevenness when I am spreading the buttercream. Comparing the two, I must say I can see what she means!

I also got 4 Wilton Bags (two 12”, 14” and 16). I already had some bags but I was advised that the Wilton bags were cotton based and better. Bet you’re wondering how when the other bags look similar and are cheaper. Well firstly, the Wilton piping bags are made from cotton then covered with a waterproof film and this helps to reduce the amount of heat that is transferred from your hand to the buttercream (which can cause the buttercream to split) and at the same time, I found it gives me more control when putting pressure on the bag to squeeze out the buttercream. Having said that, the difference with the local brand is not that significant so I wouldn’t throw them away and get the Wilton ones just yet.

I used the disposable bags mainly because I am just too lazy to wash the bags! Grease is just so difficult to get off but now that I know the benefits of the better quality bags, I think I will save the plastic disposable ones for cooking instead of baking. We also had to get 2 sets of gloves each to ensure we work in a hygienic environment and also to create another barrier between the heat from our hands and the piping bag. I used to use plastic (see a trend here??) gloves before but now I have been converted to cotton gloves – the sort you see construction workers use here. Sexy eh?

I also got a whole new set of 24 Wilton nickel covered tips including a tip saver case. They are so shiny compared to the no-brand ones I get elsewhere! I had bought some Wilton tips before but I only got the ones where I couldn’t find the equivalents here like the 1M, 1B and the 313 drop flower tip. The irony is that Wilton tips are made in Korea but their sale is so tightly controlled that you can only get them from an official Wilton store. Before contacting them, I didn’t know that I could get them in Korea so had to buy them from overseas and pay through the nose for postage. And now you know, so if you are looking for Wilton products check out www.wiltondeco.co.kr

One benefit of the Wilton tips especially in the class environment is that the all fit the standard coupler. If you buy the locally made ones, many of them are of a larger size so you can’t just change the tip even though you are using the same icing colour. This is a real pain when you have to squeeze all the BC out, push out the tip, put the new one in and then refill the bag. Talk about wasting time! So if you aren’t fuss about this, then you’ll be paying half to a third less of the price. (Local tips range from KRW700 to KRW1000 and can be found in most of the baking stores in Bangsan Market).

After we sorted out the tools that we needed, we got down to business. Crystal went through the Wilton Cake Decorating Course Book I and would translate in bursts which was easy for me to follow. The rest I could read myself as the book is in English (phew!)

First we learned to pipe stars with Open Star tip #16. How difficult could piping stars be right? WRONG. There is a technique to EVERYTHING as I was quickly finding out! A size #16 tip should create stars of a certain size and at first I was being to careful about how much buttercream to squeeze out so my teacher kept telling me, “More volume.” After practicing with the #16 tips we moved onto the round tips and played around with the size #2 and #4 as well as petal tips to create a ribbon and ruffles for the edges of a cake. We also practiced with a drop flower tip to learn how to pipe simple flowers for the heart shaped cake we decorated.

The best thing was having the teacher hold your hand and guide you. It really made a difference as I could now see how much movement is required in the wrist and how much pressure I should be putting on the bag. The angle is important too so the practicing was very important.

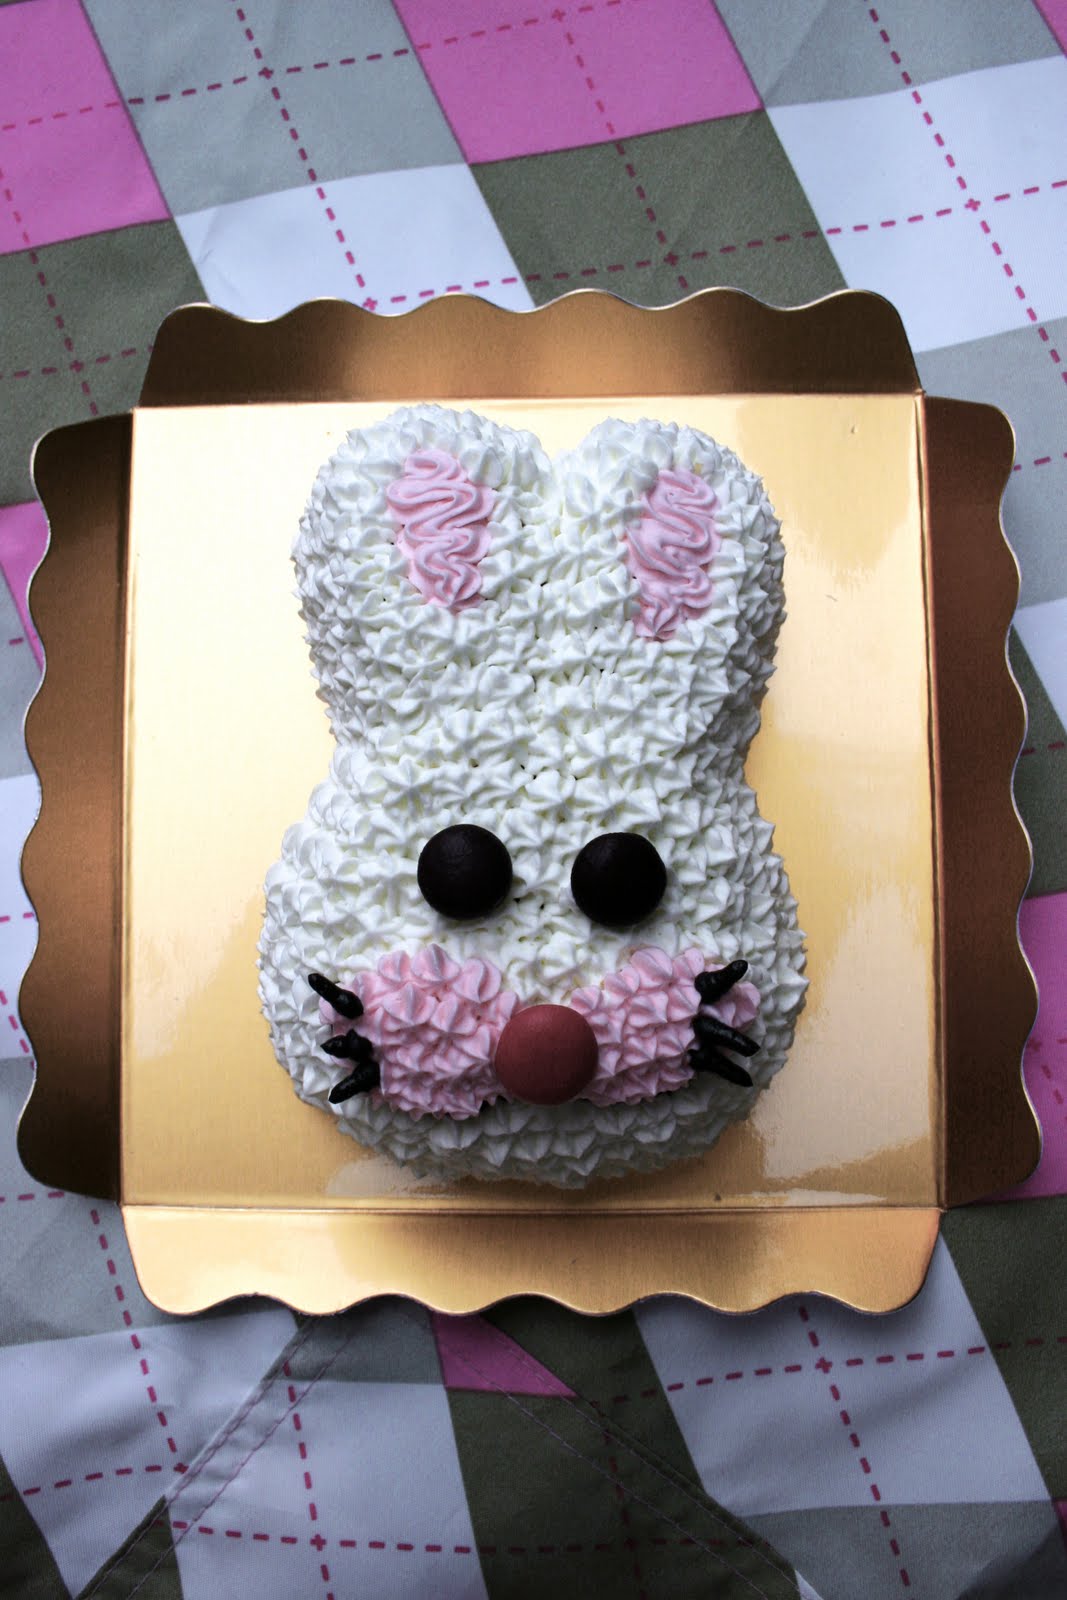
Once we were done practicing which took about 2 hours, we moved onto the actual cakes itself. We were given sponge cakes and shown how to make layers out of them and put buttercream and jam in between the layers. The first cake was a bunny cake that we had to ice using the open star tip. It’s a small cake and it still took some time. At first I thought I’d be clever and pipe all along the bottom edge until Crystal caught me at it. Then she told me to do it in sections to create uniformity to the rows and columns which made it look a lot neater. Not like someone who went crazy with the piping bag.

Here are some pictures of the cakes we made. The bunny was just adorable! I almost didn’t want to cut it… almost but the need to taste it was greater. The heart cake was such a pleasure to do. We started running short of time towards to end so I had to pipe the flowers in a slightly haphazard fashion but I think in the end it looked like it was meant to look a little all over the place.


Can’t wait for the next lesson!